-
-
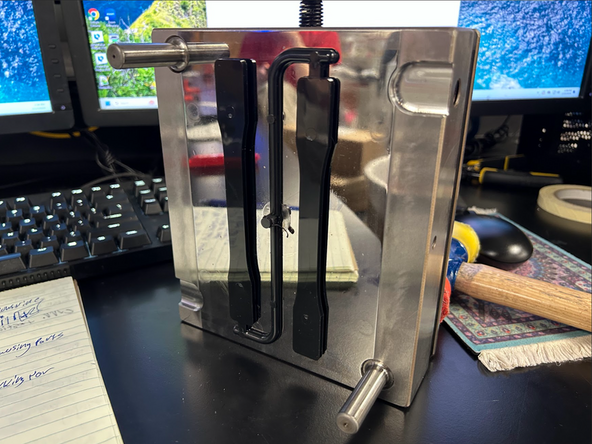
Issue: Part is sticking to the wrong side of the mold after mold open.
-
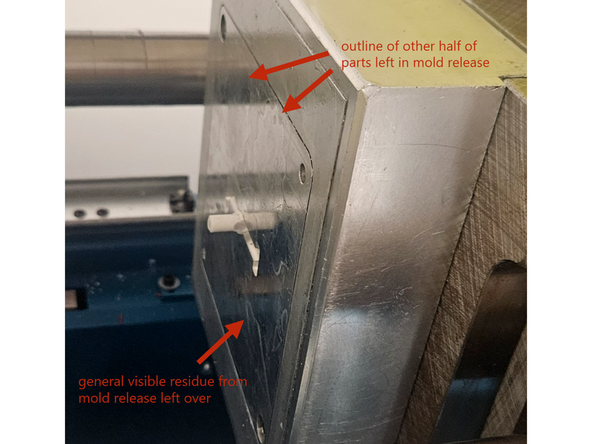
Cause: Mold release was not properly applied prior to the run, or additional mold release is needed after an excessive number of consecutive runs (~50).
-
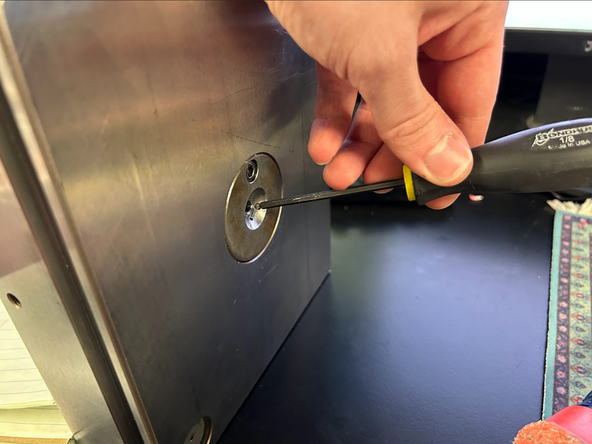
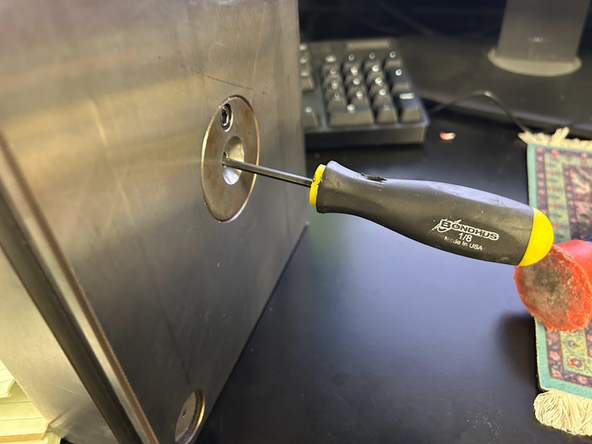
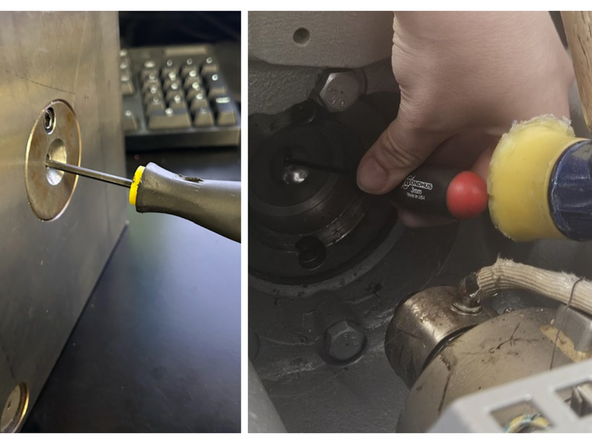
Solution: Remove the plate from the machine. Using a smaller sized allen key, hit the sprue through with a mallet so that the part comes out. Apply mold release to the mud plate side and spread with a paper towel before next run.
-
-
-
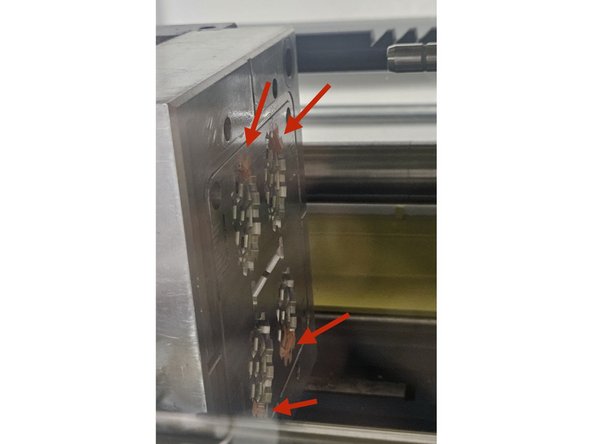
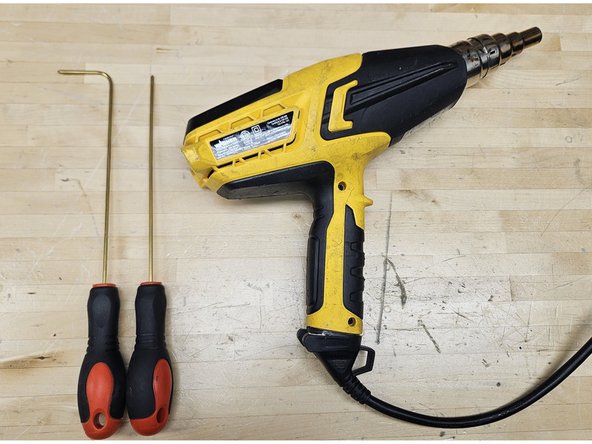
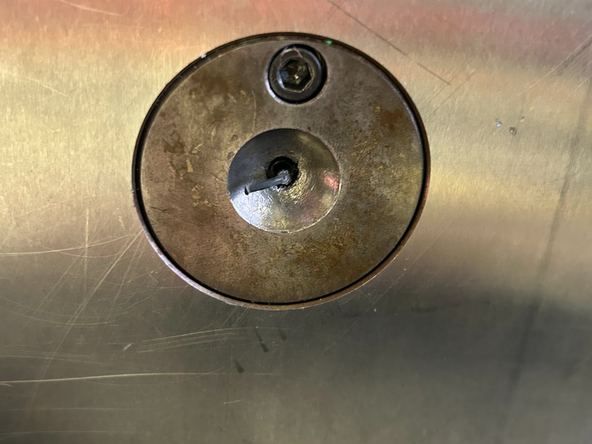
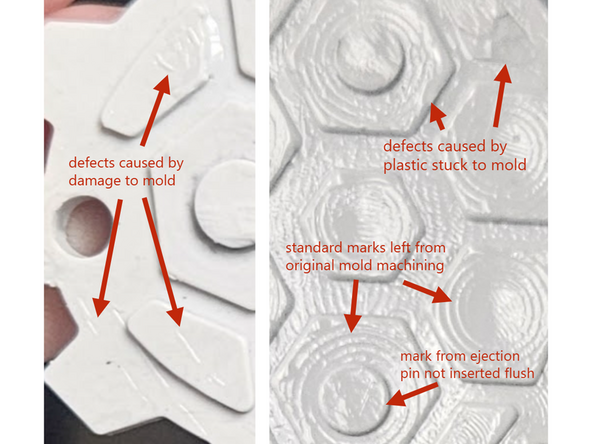
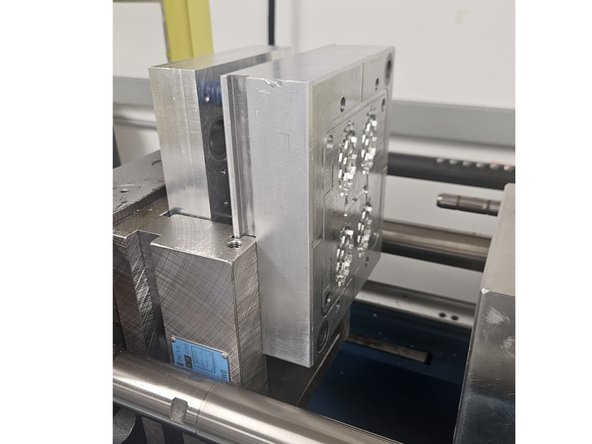
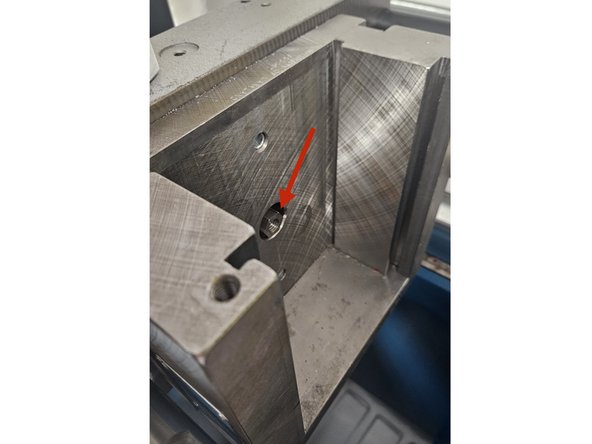
Issue: Part material remains adhered to the mold or becomes lodged between the ejector pins after ejection. Images 1 and 2 feature areas where stuck plastic is commonly found and should be inspected for adhered material.
-
Cause: Mold release was not properly applied prior to the run, or additional mold release is needed after an excessive number of consecutive runs (~50).
-
Alternatively, the cooling time may be too short, preventing proper ejection and leaving melted plastic behind. This may also cause plastic to adhere to the ejection pins, leaving the springs in an unnaturally compressed state; this should be strongly avoided, both for safety and to prevent damage to the ejection plate.
-
Solution: Remove the part by hand. In some cases, the stuck pieces can be pried off while the mold remains in the machine. More often, however, the affected side(s) of the mold inserts will need to be removed from the MUD frame and heated with a heat gun to loosen the plastic, especially if the part has partially chipped during ejection.
-
To avoid damaging the mold, use the brass picks shown in the third image to remove any adhered plastic. If significant force is required, reheat the affected area with the heat gun until the plastic becomes pliable enough to remove with a pick or wipe away with a paper towel. Nozzle attachments may help to direct heat into hard-to-reach areas.
-
Once all plastic has been removed, apply mold release to the interior of the mold. Use a paper towel to spread the mold release evenly throughout the cavity, ensuring it reaches all crevices and detailed features.
-
Note: If you are using a resin mold insert, use heat with caution, since it may cause structural damage to the mold. It may be difficult or impossible to remove adhered material in these cases.
-
-
-
Issue: Main part ejects properly, but part of the sprue remains in the mold after injection.
-
Cause: Hole may contain dirt or burrs causing the plastic to stick; should be cleaned as necessary.
-
Solution: Remove the plate from the machine. Using a smaller sized allen key, hammer the sprue through with a mallet so that the part comes out.
-
May also be due to insufficient cooling time before part release. Part adheres to ejection half of mold, but stem is not fully set and remains stuck in the injection half during removal. It then cools in place, causing light discoloration, stress marks, and excessive stringing. Increase wait time before opening the mold by 5-10 seconds and retest.
-
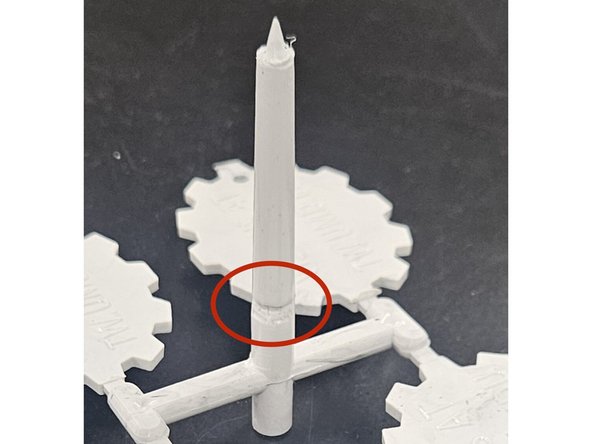
May also be caused by using TPU shims behind the injection-side insert. If not flush, plastic may leak between insert and base frame, preventing automatic ejection. Shim may also tear/protrude into the channel, causing blockages and uneven injection. In either case, a visible line should appear on the stem where plastic leaked or was blocked.
-
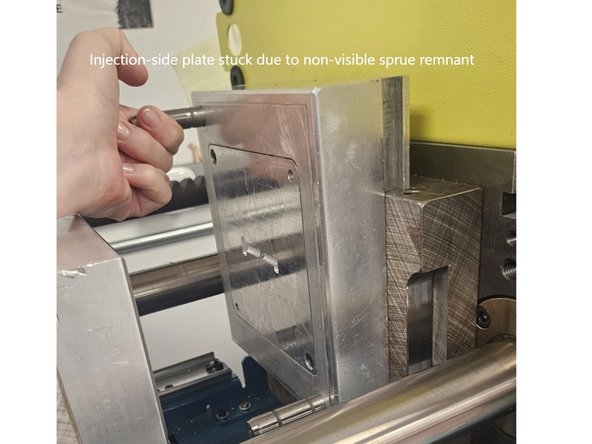
Issue: Sprue extends past the injection opening on the backside of the plate, preventing removal of the plate from the MUD frame. (If the injection-side plate can be moved about halfway out of the holder before it hits resistance and cannot be moved further, this is likely the cause)
-
Solution: Break off the "cap" or stem preventing plate removal using an allen key and mallet. From there, you can attempt to remove the rest of the sprue in a similar fashion, or remove the plate and work from there.
-
Note: Wear proper PPE when working around the plasticizing unit and nozzle after the machine has recently been (or currently is) operating. If you have difficulty removing the sprue while wearing heat-resistant gloves, ask someone for assistance.
-
-
-
Issue: Part only filled ~50-75%.
-
Cause: Most likely not enough plasticized plastic in the shot volume. Could be caused by a clog in the throat of the hopper not allowing plastic to be fully plasticized (refer to supplemental step towards end of page), temperatures being too low, or not enough injection pressure. Could also be a clog in mold's injection channel (check sprue).
-
Issue: Part filled ~80-90%.
-
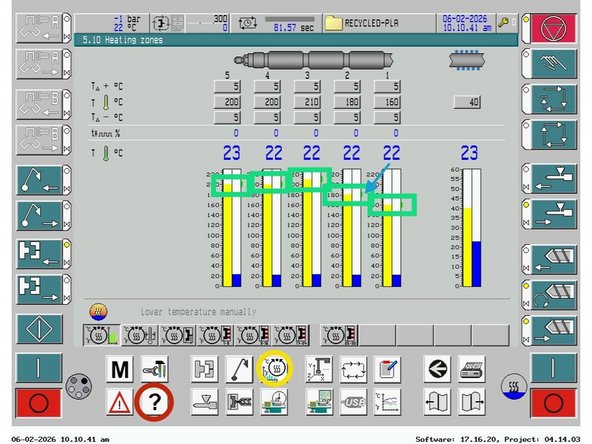
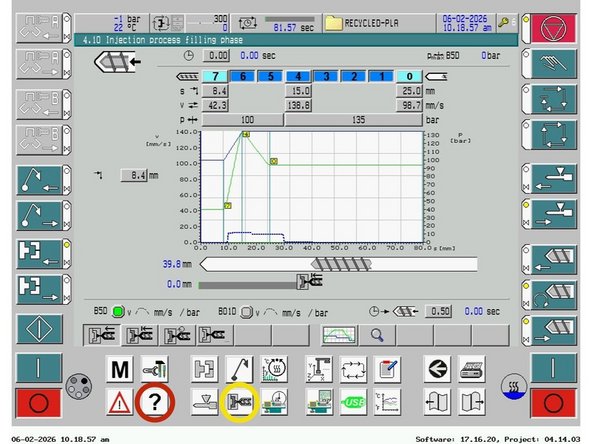
Cause: Holding pressure too low, temperature too low, injection speed too low, injection pressure too low, holding time too low. Check diagnostics on interface, making sure temperatures are within target ranges and that recorded pressures are successfully attempting to meet their set goals (there will always be a bit of discrepancy though).
-
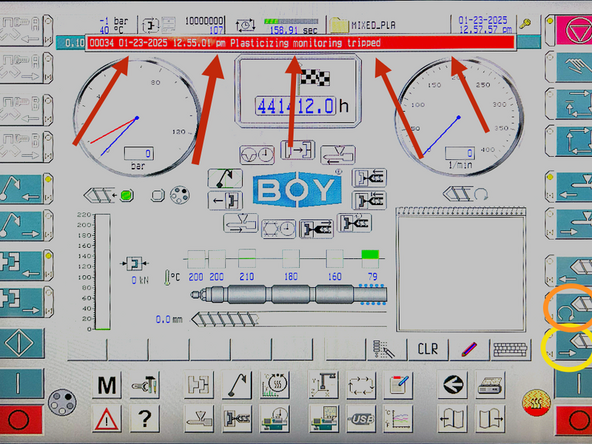
To get to these respective diagnostics pages, select the buttons in the lower navigation menu circled in yellow on the provided images.
-
Tip: If you are unsure about navigating the Boy 22A's interface, select the question mark button on the bottom left hand corner of the screen. It will bring you to the relevant section in the manual for the screen you are currently on (the manual is fully loaded digitally onto the machine).
-
Issue: Part filled >100% (plastic spills into an elephant's foot/creates flash around the part).
-
Cause: Shot size too large (during initial mold testing) or, more likely, the mold halves are not fully flush. Inspect the mold and try adding TPU shims behind ejection-side insert. If the machine errors and won’t close, one or both inserts are protruding too far and shim thickness should be reduced.
-
-
-
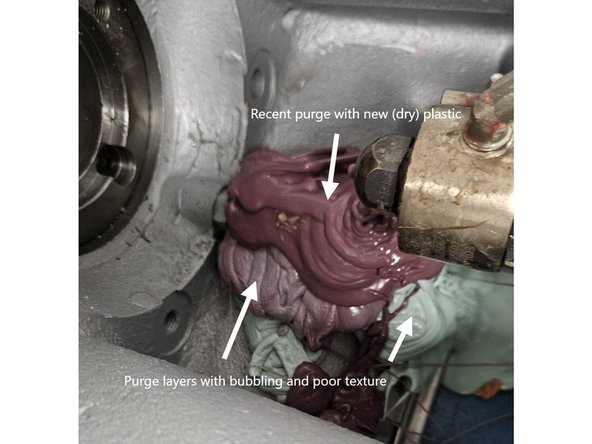
Reminder: Always make sure to do at least 2-3 full initial purges when running the machine after having it sit for more than a few minutes (and especially after it has been turned off or reheated). This will allow you to examine the quality of plastic before committing to an injection attempt.
-
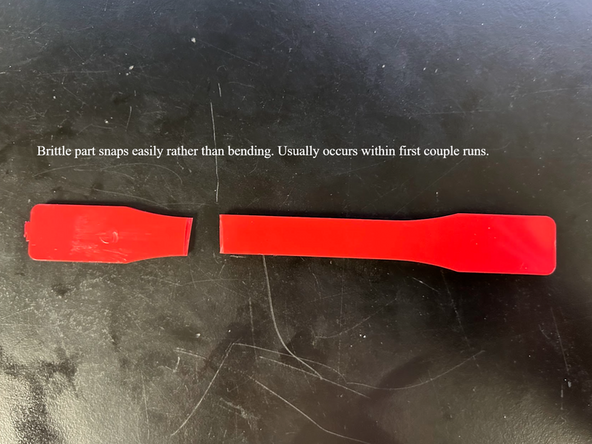
Issue: Part comes out very brittle after molding.
-
If plastic appears "dry", of a lighter color, brittle, contains discoloration consistent with light burning, or contains visible striations throughout the part, this may apply.
-
Cause: Most likely due to improper temperatures during either injection or drying. Injection temperature should be ~200°C or below; if higher, reduce the temperature accordingly. In this case, striations are caused by inconsistent or overly rapid cooling.
-
If this is the first run of the day, the issue may be residual plastic from previous runs and may be resolved by purging a few times. Before turning off or leaving the machine idle for extended periods, purge all plastic remaining in the plasticizing unit. Failing to do so may cause smoke when reheated and potentially lead to nozzle clogs.
-
Issue: Part comes out with bubbling defects, visible layering in the plastic, or a texture that is more pliable than normal.
-
Cause: Plastic may contain moisture (common in spring/summer with high humidity) or air in shot, indicated by crackling/popping during possibly uneven screw retraction/ejection. Replace hopper material with fresh plastic; purge until new material is processed. If machine will sit unused, store hopper plastic in a sealed bin with silica beads.
-
Note: If using recycled PLA, the bucket may also contain impurities that cause discoloration and textural inconsistencies even after purging, in which case using a different mix may be preferable.
-
-
-
Issue: Part contains numerous minor surface defects/identations.
-
Cause: Mold is not clean. Wipe down both sides of mold with dry towel, including channel on the injection side that forms the sprue. If debris persists, use compressed air to remove it from difficult-to-reach crevices. Once mold is clean, reapply mold release, using another clean towel to spread it into detailed areas and the sprue hole.
-
Plastic may also be stuck in the mold, resulting in reduced part volume or larger surface defects. This should also be visible on the mold itself. Refer to the issue covered in Section Two of this guide for direction on removing the plastic and resolving any underlying issues.
-
Natural wear and tear on the mold, particularly with aluminum inserts, may also cause this issue. This can be made less noticeable with darker colored plastic, or the insert(s) can be lightly resurfaced, though this will increase the cavity volume and may affect the finished part. Improper resurfacing can also cause significant mold damage.
-
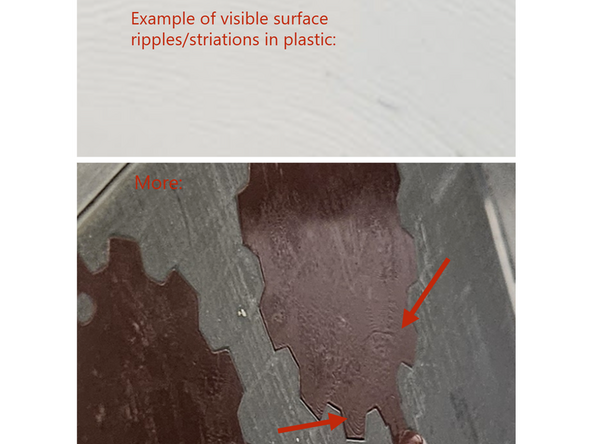
Issue: Part SURFACE contains striations (if present throughout the part or creating points of weakness, refer to Section Five); part may also appear overly slippery or shiny.
-
Cause: An excess of mold release has likely been applied. The mold may have visible ripples of liquid and may feel unevenly tacky. Apply a small amount of mold release to a paper towel and wipe the mold to redistribute the excess release and prevent the towel from absorbing too much.
-
-
-
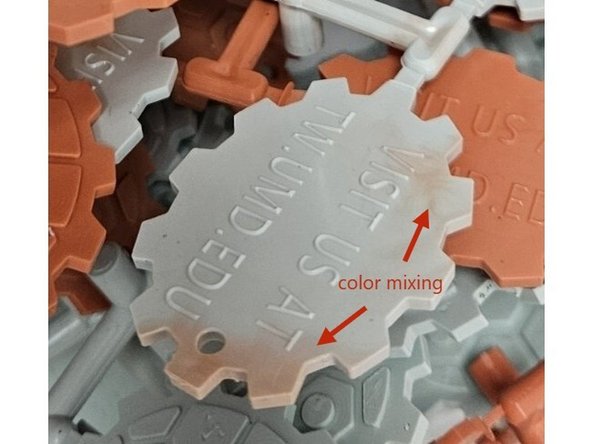
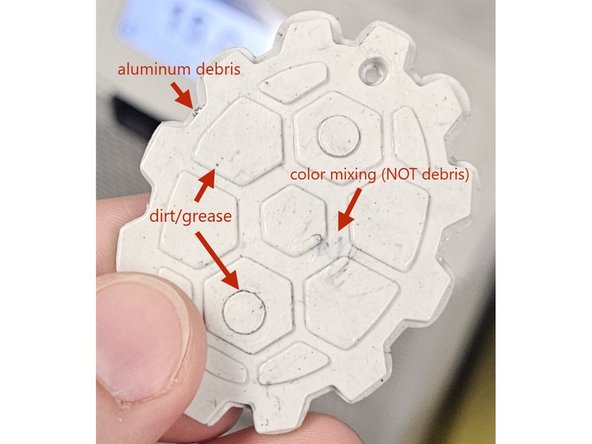
Issue: Color is not cohesive, or colors not added are showing up.
-
Cause: Already plasticized plastic is in the shot volume and combining with the new plastic added. Purging the volume several times should clear it out.
-
The injection material may also contain an uneven color mixture. For example, a hopper of mostly recycled white PLA with a small amount of black may not mix uniformly during plasticizing.
-
Issue: Part contains debris and/or dark or shiny (metallic) specs.
-
Cause: Mold is not clean. Wipe down both sides of mold with dry towel, including channel on the injection side that forms the sprue. If debris persists, use compressed air to remove it from difficult-to-reach crevices. Once mold is clean, reapply mold release, using another clean towel to spread it into detailed areas and the sprue hole.
-
-
-
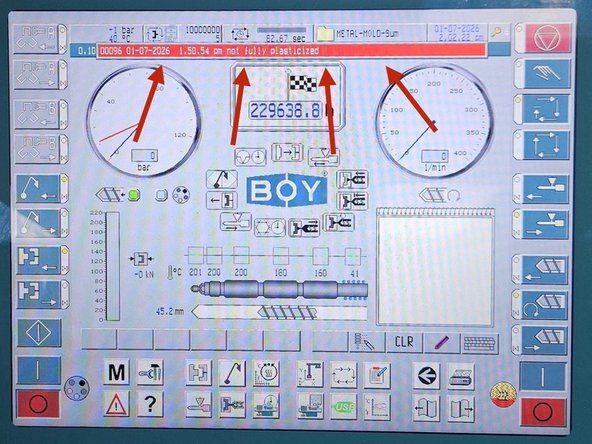
Issue: Error code 096, "Not fully plasticized"; Error code 034, "Plasticizing monitoring tripped". Ran into during Semi-Auto or Automatic run modes.
-
Cause: The machine may not be finished fully preheating. Check the page with the machine temperatures to confirm.
-
Another possibility is that the screw was unable to move to the fully rear position during the plasticizing step. This means something is preventing the plastic from melting and entering the valve. Most likely there is a clog in the throat causing a blockage of new plastic.
-
Solution: Remove the hopper and as much plastic from the throat as possible. Using a screw driver, break the clog out of the throat while being careful not to scratch or damage the screw (refer to supplemental step towards end of page).
-
This may also be caused by decompressing the screw/plasticising unit instead of feeding new material into it.
-
For ALL standard processes, the decompression feature should not need to be used. This is the screw button with a right arrow (circled in yellow) in the right panel of buttons. The feeding button is represented by the screw with the circular arrow (circled in orange).
-
Solution: Make sure all the temperatures are at their proper levels (checking the heating zone screen) and then repeatedly purge out the plastic in the plasticizing unit and nozzle (with the inject button (green) and then the feed button) until the plastic ejects in a normal manner without difficulty.
-
-
-
Issue: Injection-side plate can't be installed.
-
Cause: There may be some friction between the plate and the frame. Remove the plate and make sure it is properly parallel before slowly re-inserting it, wiggling it back and forth a bit if necessary.
-
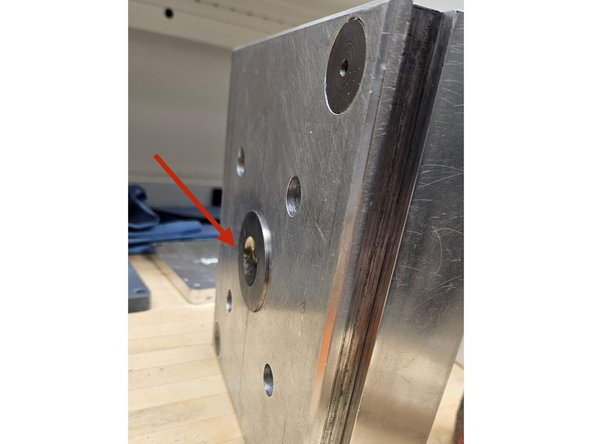
If using the MUD unit with insert openings, the locating ring/register ring (the circular metal piece in the center, as marked) may be protruding slightly, causing the plate to rest upon the lip upon insertion. This can be adjusted with a mallet, but take care to only move it until it is flush and not push it through toward the opposite side.
-
Issue: Ejection-side plate can't be installed.
-
Cause: The screw in the frame is likely protruding slightly from the face where the plate slides in, causing the plate to rest upon the bolt upon insertion. Twist it back slightly to provide additional clearance.
-
Note: Neither plate should be extremely tight-fitting or appear “stuck.” If external force is required to install or remove either plate, there is likely an underlying issue that has not been addressed.
-
-
-
Issue: Injection-side plate can't be removed.
-
Cause: Sprue remains inside the injection hole, protruding outward such that a blob or “cap” of plastic blocks the plate from being fully removed. Refer back to the “sprue remains inside injection hole” section for further instructions.
-
Issue: Ejection-side plate can't be removed.
-
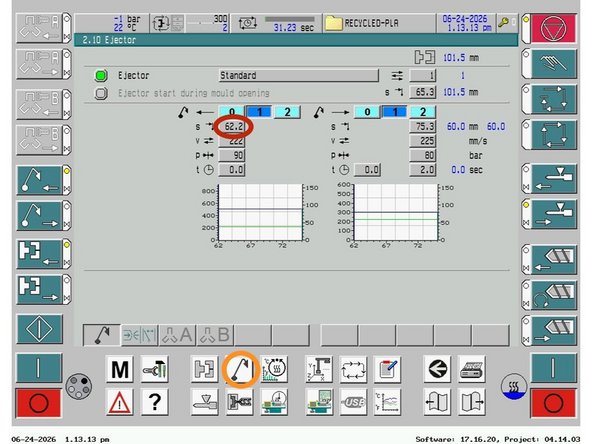
Cause: Ejection pins were not sufficiently retracted before attempting to remove the plate containing the B-side (ejection-side) insert. They should be retracted to ~10 mm (setting circled in red; access the ejector page by selecting the menu item circled in orange) before removal, then returned to 62.2 mm once the plate is reinstalled.
-
-
-
Issue: The two halves of the mold will not fully close upon manual or automatic direction through the machine.
-
Cause: The inserts protrude from the primary MUD frame, likely due to excessive shim thickness behind the inserts (though TPU shims should only be used behind the ejection-side insert). Newly machined inserts may also be too thick. If using a new MUD unit, the mold closure settings may need adjustment to accommodate the new closure distance.
-
Another cause could be debris on the frame's guide pins. Wipe the guide pins and their holes with a dry paper towel to remove any debris and resolve the issue.
-
While unlikely, another cause could be a slight vertical misalignment between the two halves. If the injection pin holes are not a perfect fit, having the pins fully extended before closing the mold may slightly elevate the ejection side.
-
If none of the above resolve the issue, flip each mold half individually and retry closing the mold. Be sure to check for debris beneath the frames, as this can also cause slight elevation of the mold halves.
-
-
-
Issue: Machine takes an unusually long time to preheat (standard time is ~20 minutes), or some temperature bars in the heating zones section of the interface exceed the target threshold while others have not yet reached it.
-
This does not include the wait time after the machine is fully preheated:
-
The additional period (roughly ~2 minutes) allows for temperature soaking, which ensures that the heat is distributed evenly throughout the barrel and that the plastic is fully molten. Once preheating is complete, a horizontal red bar will appear beneath the temperatures, displaying the remaining wait time.
-
Cause: This almost certainly indicates that the chiller was not turned on. Check the temperature bars to confirm: red indicates temperature is above the set threshold for that heating section. Always turn on the chiller and allow it to reach 15°C before preheating. Power cycle the machine after turning on chiller before resuming preheating.
-
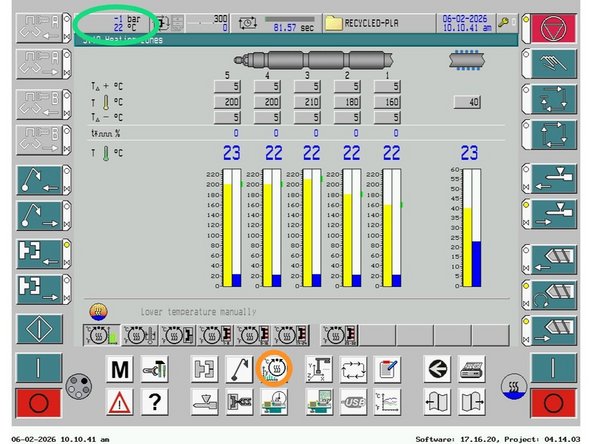
Tip: To access the heating zones section of the interface, select the menu item circled in orange in the attached image.
-
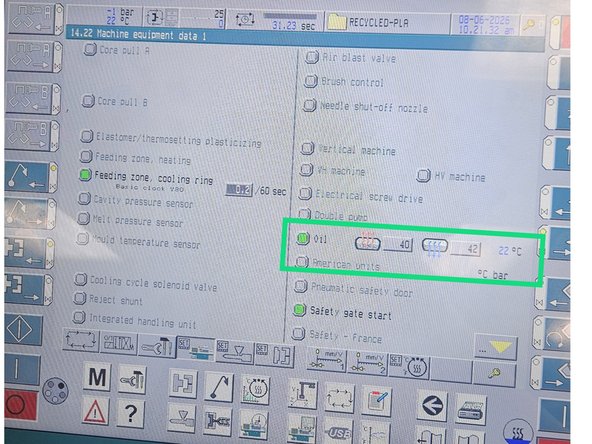
Note: The machine oil must also finish preheating. Unlike the heating zones, it does not have a temperature bar and is monitored using the values circled in green in the image (the other being the machine pressure). The machine will not prevent operation if the oil is underheated or overheated, so pay close attention to this value.
-
Typically, the oil is fully preheated once the machine's loud buzzing stops. You can also select the oil temperature value and view the following page to check the acceptable temperature range.
-
-
-
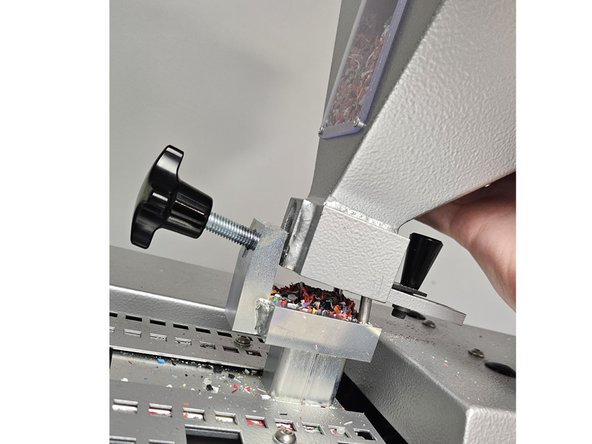
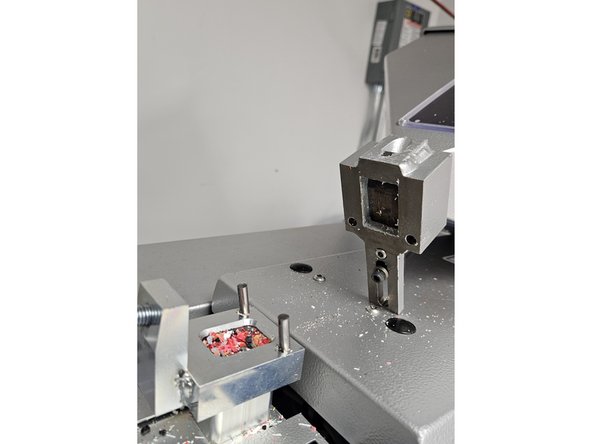
Often, a clog is a symptom of a larger issue rather than something immediately recognizable on its own. To check for and remove a potential clog:
-
1. Push in the slide gate to close off the primary reservoir of the hopper.
-
2. Loosen the thumbscrew to release the hopper, then twist it back far enough to allow proper clearance.
-
3. Remove the hopper and inspect for any clogs, cleaning both the hopper itself and the continuation of the throat fixed within the machine. Be sure to also clear any material around the interface where the two parts meet.
-
4. Reattach the hopper to the machine, ensuring the thumbscrew is tightened before pulling the slide gate back out.
-