
Introduction
In this guide, you will learn how to configure Zoom to start when Mac starts & how to log in after Zoom starts. After you are logged in to Zoom, you will be shown as “Online” to other Zoom users, thus enabling features like direct-dial & chat.
-
-
Before you begin, log in to your Mac and go to the desktop.
-
If you do not have Zoom installed on your computer, please install it prior to continuing this guide.
-
Download via https://zoom.us/download
-
-
-
Go to Finder > Applications > Zoom to open the Zoom application.
-
Pro tip: use spotlight search (CMD + Space) & type Zoom to quickly locate the application.
-
If you are not signed in to Zoom, do so now.
-
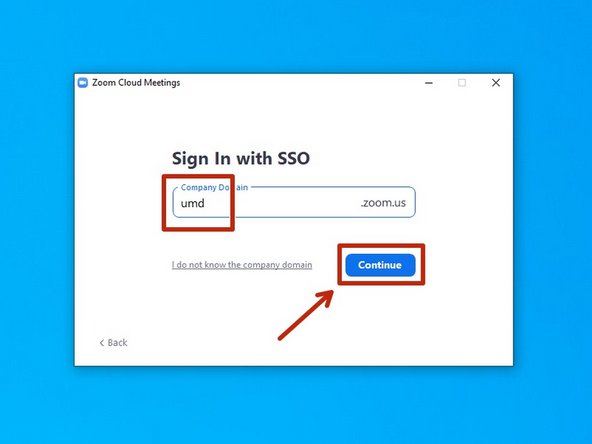
You should choose the Sign In with SSO option, in the Enter your company domain field type umd and then click Continue.
-
CAS will open in your browser. Sign in & complete your Duo push. When you are finished, Chrome may prompt you to "open a link in Zoom." Click allow or ok.
-
Once you are on the Zoom home screen, continue to the next step. The home screen looks like the third picture in this step.
-
-
-
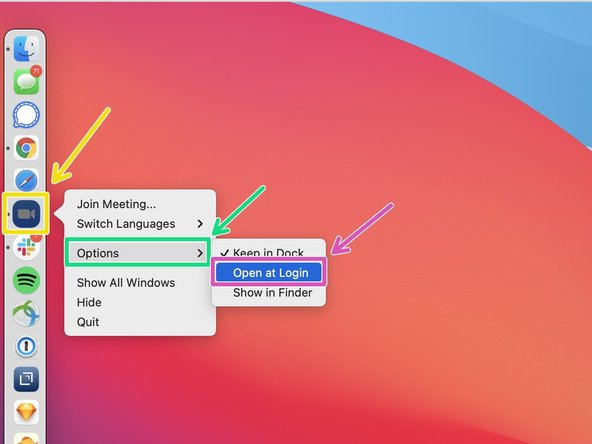
In your Mac's dock, right click on the Zoom icon.
-
Hover over Options to open the submenu.
-
Click on the option for Open at Login.
-
From now on, when you start Mac, Zoom will also automatically start. You will still need to go through the sign in process but everything will be pre-filled.
-
When Zoom first loads, click Sign In as you normally would, then click Sign In with SSO, then click Continue (umd should already be pre-filled in the text box). You will not need to authenticate via CAS again & will be automatically signed in.
-
After you sign in to Zoom, you will be shown as "Online" to other UMD Zoom users, thus enabling direct-dial & other Zoom features.
-


Congratulations, you now know how to configure Zoom to start when Mac starts & how to sign in after Zoom starts.
Congratulations, you now know how to configure Zoom to start when Mac starts & how to sign in after Zoom starts.