
Introduction
A guide to using advanced techniques for slicing parts in Eiger.
Pictures by: Nico Lagendyk
-
-
Under reinforcement material select the material that the customer requested.
-
Once you select any material in this field a new tab will appear entitled "Reinforcement"
-
-
-
Under the reinforcement tab you'll be able to edit some of the basic settings concerning the fiber reinforcement
-
You can edit the total number of layers of fiber that will be added to the part and Eiger will space them out through an algorithm but you'll learn how to edit that manually in the next steps
-
The fiber fill type chooses the algorithms which control how fiber will be used to reinforce the part.
-
Concentric is good for reinforcing the walls of a part while Isotropic makes a part relatively stiff in all directions.
-
You can adjust the number of rings of concentric fiber fill added per layer. The more rings, the stronger your part
-
The fiber angles are a comma separated list of angles in degrees that controls the fiber direction for each layer
-
Lastly for the concentric fiber fill type you can select which walls will be reinforced with concentric fiber
-
-
-
Once you've finished the basic settings, you can click save which will highlight another button called internal view which will allow you to customize the reinforcement layers
-
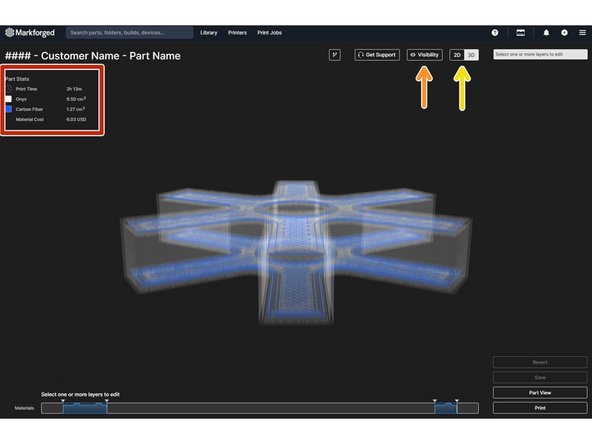
The internal view is like an x-ray of your part with the material being white and the reinforcement in blue which you can see under the part stats
-
You can adjust the visibility of the layers such as: the concentric and isotropic fiber fills, the infill, the floor and the wall
-
You can change the view between 3D and 2D which will help when reviewing individual layer fiber patterns
-
-
-
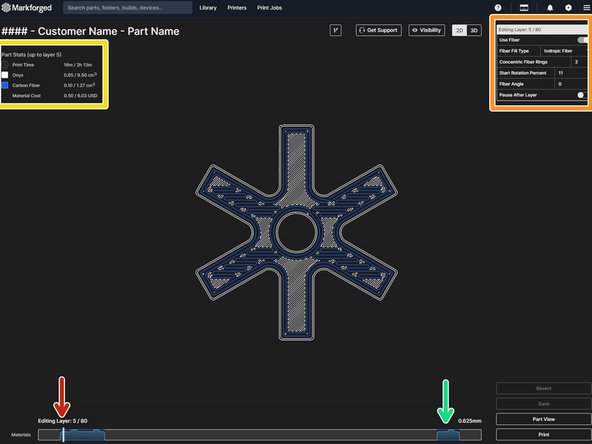
When you select a layer a new window will pop up that will give you settings for the fiber that are all completely editable
-
In this window you'll be able to edit whether or not to use fiber, the concentric rings, start rotation percent, fiber angle, and when to pause the fiber layers
-
The part will automatically update after you change any of these parameters
-
Depending on what layer you're on, the print time and material volume will change
-
Something to note is that the infill increases to 100% when using fiber reinforcement which is why adding fiber adds significantly to the cost of a part
-
Lastly you can see the quantity of fiber per layer in a elevation chart at the bottom of the page
-


I encourage you to explore these settings on your own time as every part is different and structural support will only work to your advantage if implemented correctly.
I encourage you to explore these settings on your own time as every part is different and structural support will only work to your advantage if implemented correctly.
