Introduction
The Epilog Job Manger is the main hub for easily managing machine profiles, as well as previous jobs, material settings, and specific job settings. Through this manager, you can completely control every aspect of the cutting/engraving process. All of the features in the Epilog Job Manager are local and specific to the computer that prints to the Epilog.
-
-
The first time opening the Job Manager, you'll see a tab for each of the machine models. Make sure you select the "Epilog Fusion Pro 36" under the Fusion Pro tab.
-
Double check that the laser power is set correctly.
-
For the CO2 Laser it is 80 Watt
-
For the Fiber Laser it is 50 Watt
-
-
-
We use Adobe Illustrator, which is provided by the University of Maryland for free to anyone that has a UID login through TERPware.
-
Once the Adobe Illustrator file is prepped for cutting/engraving, select the "Epilog Engraver" as the printer. Then click print.
-
This will send the document to the Epilog Dashboard, to send it to the Job Manager click the "Send to JM" button in the Epilog Dashboard.
-
To learn the process of how to send a basic job to the Epilog and print it using the Epilog Dashboard, visit this guide.
-
-
-
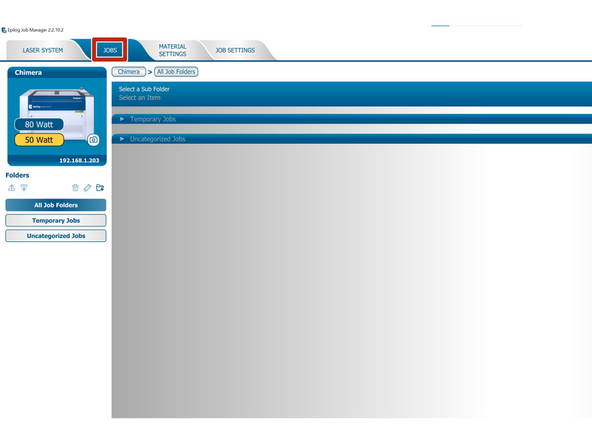
In the Epilog Job Manager, click on the Jobs tab. All of the jobs sent to the JM will be located here, along with the date they were last printed, when they were created, runtime, and settings.
-
In this case, there are no jobs that have been explicitly sent to the job manager, so the page is blank.
-
All of this information is local to the computer. As a result, it is important to save this information before ending your Epilog Dashboard session of whatever parts you are trying to cut.
-
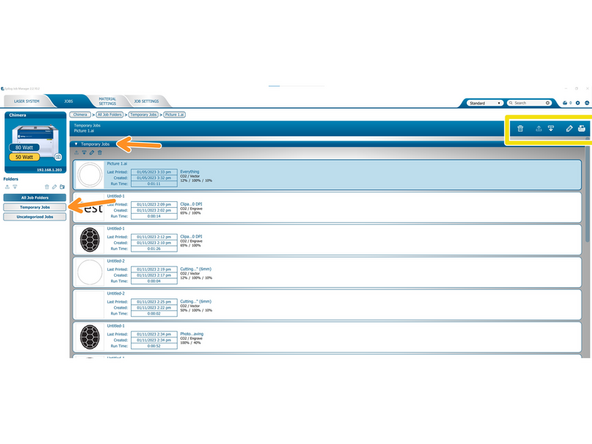
If you click on the Temporary Jobs folder, it will show you the most recent jobs you have sent to the Epilog, however, it is highly recommended to manually save to the job manager instead of relying on this.
-
From this you can delete, edit, or quick print your previous job.
-
The edit button will take you to the same preview screen as the Epilog dashboard, only instead of a Print option it is a Save option.
-
-
-
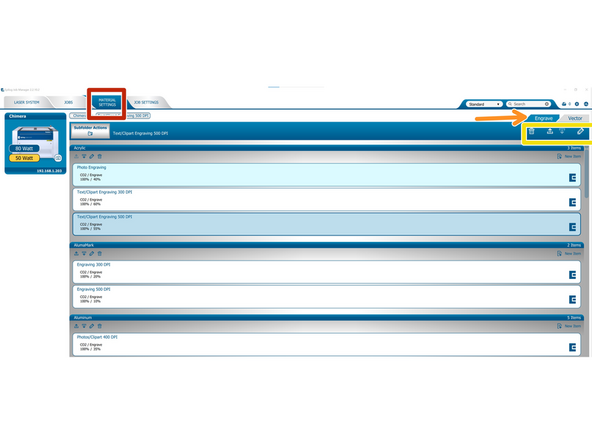
The Material Settings tab is where all of the presets for the Epilog are saved.
-
There are two subfolders, the engraving subfolder, and the vector (cutting) subfolder.
-
Similar to the jobs, you can delete and edit all of these preset settings.
-
New recipes should only be saved by a staff member under the proper subfolder to ensure that the settings are easily found in the future and follow the current standard of organization.
-
-
-
All of the saved job settings are saved in the Database for the job manger.
-
If a user needs an updated version of the database with all of the current settings preloaded, first they need to download the most recent database file from TBD.
-
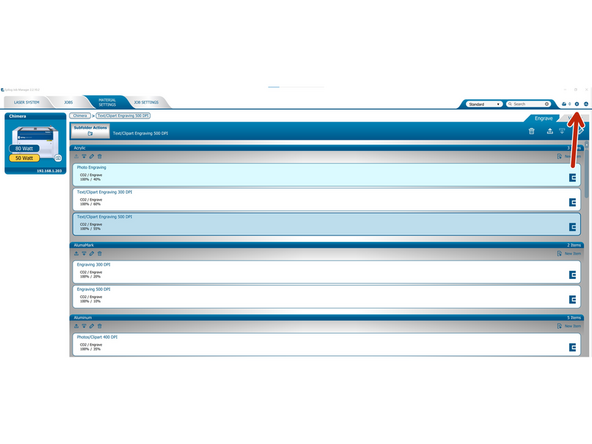
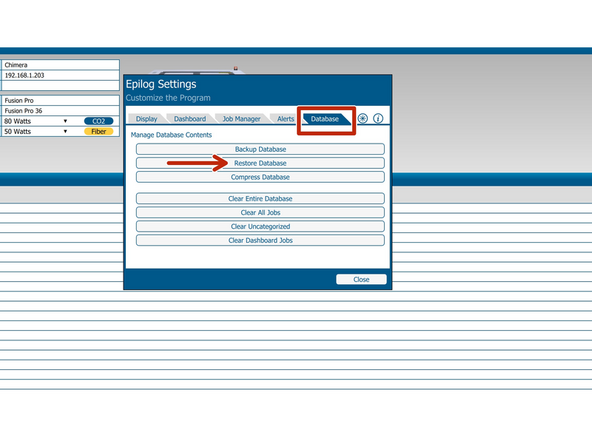
Then click to the settings wheel, then Database, then click Restore Database.
-
This will load all of the current saved settings onto the user's Job Manager.
-
This concludes the features of the Job Manager and its use cases. In most cases, the job manager is not necessary as we do not have a dedicated computer for the Epilog. The features for saving job settings are not necessary either, but do make repeating jobs a lot easier for the user as there is no manual input of settings.
This concludes the features of the Job Manager and its use cases. In most cases, the job manager is not necessary as we do not have a dedicated computer for the Epilog. The features for saving job settings are not necessary either, but do make repeating jobs a lot easier for the user as there is no manual input of settings.
Cancel: I did not complete this guide.
5 other people completed this guide.


