
-
-
Here is the layout for what you will be using. There are three components:
-
Positive Test Lead (Red probe)
-
Negative Test Lead (Black probe)
-
Keysight U1733C LCR Meter
-
-
-
The power button turns it on and off
-
You can connect a component in two different places
-
You can directly plug in the leads of a component into the component socket
-
Or you can connect a component with the between the two leads
-
If testing a polarized component, make sure you connect the appropriate leads to the positive and negative terminals on the LCR meter.
-
Make sure to discharge capacitors or any other charged components before testing to avoid potential damage to the meter or the equipment being tested
-
-
-
Press the Freq. key to select a suitable test frequency
-
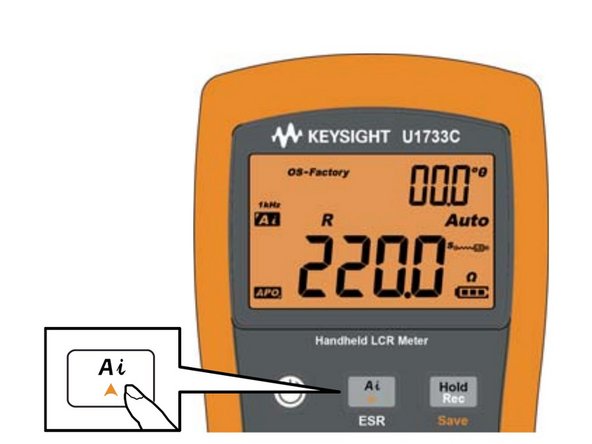
The Ai key will automatically identify the appropriate measurement required for the device-under-test (DUT).
-
The Ai key is probably all you will need for most measurements
-
The Ai symbol will flash while the LCR meter identifies the DUT, and
-
Selects an appropriate measurement in the primary display (L, C, or R) and secondary display (D, Q, or θ),
-
Selects an appropriate range
-
Selects an appropriate measuring mode (series or parallel).
-
Alternatively, you can press the ZLCR key to switch to your desired measurement in the primary display (Impedance, Capacitance, Inductance,or Resistance).
-
-
-
If you are measuring Impedance, Capacitance, or Inductance, you can use the DQθ key to switch to your desired measurement.
-
Your measurement will appear in the secondary display (Dissipation Factor, Quality Factor, or Phase Angle)
-
The LCR meter can also test your component in series or parallel for all ranges
-
Press the ZLCR key for more than 1 second to toggle the parallel and series mode. Series mode is set as the default setting.
-
To enable the tolerance mode, insert an appropriate component as a standard value into the component socket or connect the test clip to the component leads, then press the Tol% key to set this value as the standard reference tolerance
-
This function is designed for convenient component sorting. The beeper will beep three times whenever the component under test exceeds the setting tolerance. Conversely, when the beeper beeps once, this indicates that the component is within the setting tolerance.
-
The tolerance mode cannot be activated if is shown on the display or when the tested capacitance value is below 50 counts.
-
Tolerance mode is only available in manual ranging; therefore, activation while in autoranging will automatically set the LCR meter to manual ranging.
-
-
-
Press Ai for more than 1 second to select the ESR measurement. Use the ESR measurement to measure the equivalent series resistance of the capacitor, independent of its capacitance
-
Press Freq. for more than 1 second to select the DCR measurement. The DCR measurement measures the resistance of an unknown component by 1 VDC.
-
-
-
Freezing the Display (Hold)
-
To freeze the display for any function, press the Hold key. The Hold annunciator is shown on the display while the Hold function is active.
-
Press Hold again to update the reading automatically once it is stable. The Hold annunciator flashes while waiting for the reading to be stable.
-
Press Hold for more than 1 second to release the Hold function.
-
Enabling the static recording mode (Rec)
-
Press the Hold key for more than 1 second to enter the static recording mode.
-
Press Hold again to cycle through the Max, Min, Avg, or MaxMinAvg (present) input values.
-
To exit this mode, press and hold the Hold key for more than 1 second.
-
-
-
Setting the high/low limit comparison (Limit)
-
The high and low limit comparison function helps you to sort components easily. There are 32 limit sets available (16 fixed factory sets, and 16 variable user sets).
-
Press the DQθ key for more than 1 second to activate the high/low limit mode. The last-known set number (H## or L##) will be indicated in the secondary display.
-
While the Limit annunciator is flashing, use the Ai or Freq. key to select an appropriate limit set.
-
You may press DQθ or Range again to toggle between the high (H) or low (L) values shown on the primary display.
-
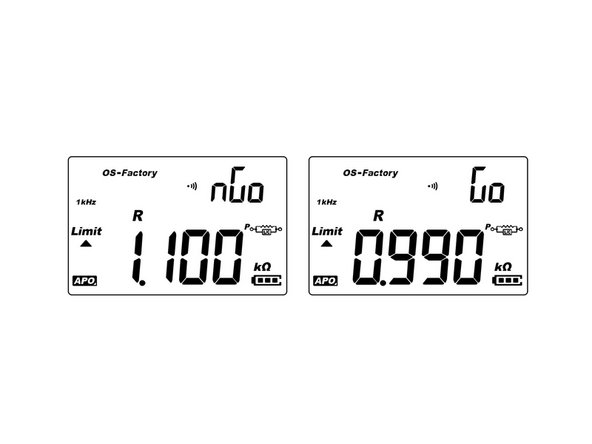
Press Hold while the Limit annunciator is flashing to start the comparison. (If no activity is detected after 3 seconds, the comparison will also begin.) The LCR meter beeps three times and displays nGo in the secondary display if the reading is greater than the high limit or lesser than the low limit.
-
If the reading is within the high and low limits, the meter beeps once and displays Go in the secondary display.
-
-
-
Making relative measurements (Null)
-
When making relative measurements, also called null, each reading is the difference between a stored (selected or measured) relative value and the input signal.
-
One possible application is to increase the accuracy of a resistance measurement by nulling the test lead resistance (test leads shorted). Nulling the leads is also particularly important prior to making capacitance measurements (test leads open).
-
Press the ΔNull key to enter the relative mode and store the display reading as a reference value. The LCR meter will then display all subsequent readings relative to the reference value.
-
The Δ annunciator is shown on the display while the relative mode is active. Press ΔNull again to exit the relative mode.
-
The relative mode cannot be activated if the display value is OL.
-
Relative mode is only available in manual ranging; therefore, activation while in autoranging will automatically set the LCR meter to manual ranging.
-
-
-
Performing the open/short CAL
-
The CAL function offsets (corrects) the LCR meter's internal parameters as well as external connector residues for further measuring. Performing this action will help you to correct the influence for temporary uses.
-
It is highly recommended that open/short CAL be performed before making precision measurements.
-
Press and hold the ΔNull key for more than 1 second to enter the open/short CAL mode for the selected frequency and range.
-
Open/Short CAL prompts will be shown on the display. Follow the prompts for open connector (OPn) or short connector (SHor) connection and press the ΔNull key.
-
After the open/short CAL is completed, the LCR meter will be restored to the normal display and ready for normal usage.
-


Team
