-
-
Ensure all proper PPE is worn.
-
Glasses required
-
Headphones recommended
-
-
-
We have 2 types of nail guns in the Woodshop: the pin nailer and the brad nailer.
-
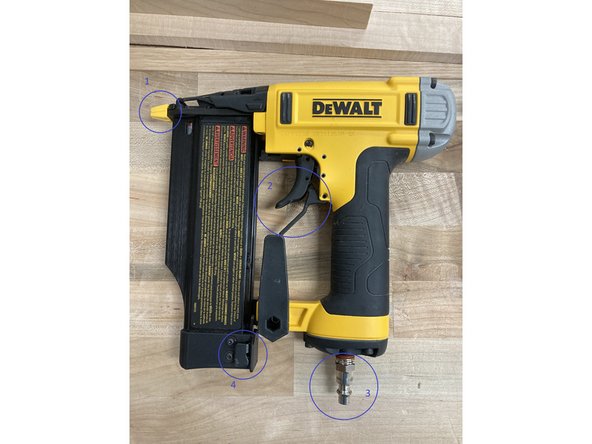
The pin nailer uses smaller nails that have a very small head, making them less visible. They are weaker and have less holding power, but aren't as visible. They are a good tool for holding boards together for adhesive.
-
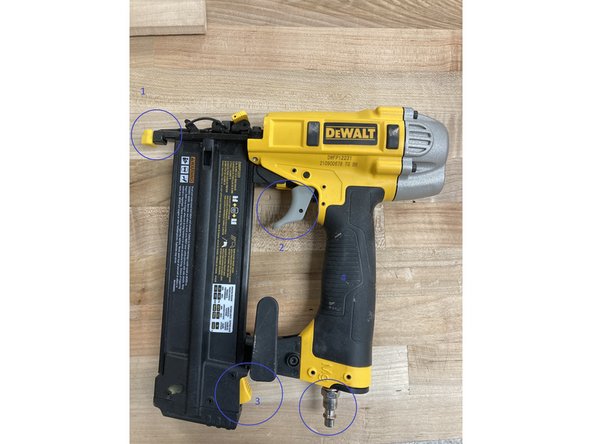
The brad nailer uses a larger nail, although it is still relatively small. It is stronger than the pin nailer, but has a larger profile. This is more of a general-purpose nailer, which can be used with glue as well as by itself.
-
-
-
1. Nose Piece
-
Protects work piece
-
2. Trigger and Safety
-
In order to fire a nail from this nail gun, you must pull the safety (below) and hold it while you pull the trigger
-
3. Hose fitting
-
Attach air hose
-
4. Magazine release
-
Press here to release the magazine to load nails
-
-
-
1. Nose piece/Safety
-
On the Brad Nailer, the safety is disengaged by pressing down the nosepiece
-
2. Trigger
-
3. Magazine release
-
4. Hose fitting
-
-
-
Ensure the gun is loaded with the correct nails (Brad or Pin).
-
Attach the air hose to the fitting.
-
Press the nose against the work piece (note on the Brad nailer this disengages the safety).
-
Apply firm pressure and nail.
-
ALWAYS keep your hands away from the nose, and never hold the piece near where a nail will go. If you need to brace the wood, use a clamp.
-
Cancel: I did not complete this guide.
One other person completed this guide.


