Introduction
3D engraving is the practice of turning 2D images into a heightmap based on a 256 grayscale image that can be cut at different depths using kcam to create a 3D effect.
Tools
Parts
-
-
Surface engraving is when materials are marked or etched, and relies on a lighter wattage, power, and speed.
-
3D engraving is when the etchings are made at varying depths based on the grayscale image provided.
-
It common uses are in décor, signage, memorials, and creative patterns.
-
-
-
3D engraving relies on a great grayscale file.
-
These can be made uses various techniques in CorelDraw and Adobe Illustrator or Photoshop, with a guide coming soon.
-
In the Kern's computer under "C:\Program Files (x86)\Kern\Samples" are some sample images that include the proper 3D grayscale file needed to take advantage of the built-in 3D engraving.
-
Companies such as gantryco sell these types of images.
-
These types of images can also be created using .stl files and blender. This video walks through the basic idea of how to create such images in blender.
-
-
-
The Kcam program will interpret any different shades of grey as 3D engrave lines, regardless of any settings, however, they are only really noticeable when the engraving speed is lowered to around 45 inches per second.
-
This is why light grey lines are not visible or recommended when you 2D laser engrave as Kcam will interpret it as a really light engraving, which often shows up as nothing being engraved at all.
-
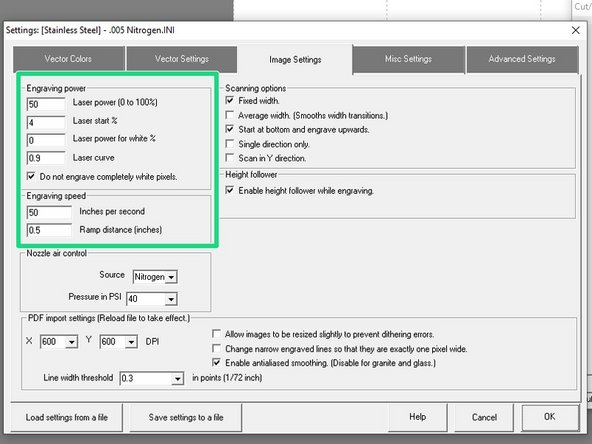
All of the settings that need to be changed are in the "image settings" tab in the settings menu.
-
Engraving power and engraving speed are generally the only two sections that need to be changed depending on the material being cut.
-
For hardwood, it is recommended to be an engraving speed of 45 inches/second at 100% power, however, some troubleshooting may be required to achieve the desired engraving.
-
-
-
Generally speaking, closed grained woods will 3D engrave really well.
-
Kern themselves have recommended settings for maple, which is probably the best type of wood to use due to both its hardness and lack of an open grain.
-
Open grain is the spongey looking part in the cross-section of hardwoods, in the picture is an example of Oak wood.
-
-
-
Sometimes excess wood is "burned" onto the finished 3D engraving.
-
Use a shop towel from the backroom and some water to gently rub away the burn marks.
-
Fine details in the engraving may break off, so be careful when wiping down finished engravings.
-
This method also works for 2D engraving, but is less of an issue due to less material being burned away during the engraving process.
-
Air blasting is also a viable option for removing the ash from the engraving.
-
-
-
Helpful links with more information from Kern:
-
-
-